Showing posts with label spring. Show all posts

Friday, May 14, 2010

Planting seeds

Planting... and hopefully growing! My daughter was recently given this little Sesame Street-themed planting activity. It came with everything needed for some afternoon fun!


You will need:
  • A planting kit (ours came from Lowe's and included seeds, pots, soil pellets, and little garden tools), or you can certainly just use your own seeds and pots!
  • Water
  • A bowl for mixing up the dirt
  • A tray or something else to catch water that drips through the pots

I assembled everything needed on the counter (but this would be a WONDERFUL outdoor activity!) and then called my daughter to come help do some planting. Begin by putting your soil pellets (or potting soil is just fine) in a bowl.


Add water. The directions on our kit called for two cups, and it was definitely wet enough.


Mix. Guess who LOVED this part??


Arrange your small pots on the tray.


Fill each pot halfway with soil.


This part of the activity was a hit as well!


Drop seeds in. We had bell pepper seeds. They are so tiny... I'm really hoping they grow because I love bell peppers!


It's a little messy (which is why this would be a great outdoor activity!), but not nearly as bad as you might imagine.


Finish filling the pots with the remainder of the soil to cover the seeds.


Find a sunny location to let them grow, and don't forget to water them. And since we did this activity several days ago, I can now speak from experience by telling you... watch out for wind! Unfortunately, I didn't think so much about this when I put the pots out on our sunny (and unshielded from the elements) patio table. I realized they'd blown over about two days later... boo. I'm really hoping I recovered at least some of the seeds to put into a more sturdy container!

Thursday, May 6, 2010

Coffee filter butterflies

Here's a super quick craft, using a household supply almost everyone has on hand!


You will need:
  • Disposable coffee filters
  • Paints (my daughter wanted to use Do-a-Dots, but watercolors would work fabulously here!)
  • Pipe cleaners in any color (twisty ties that come in boxes of garbage bags would work here as well!)
  • Newspaper... not pictured, but I quickly discovered this was a necessity! :)

Spread out a coffee filter.


Line some newspaper underneath and let your little one paint away!


The dot paints dried VERY quickly, and we were able to make a "butterfly" using our pipe cleaners in no time at all. Just scrunch the filter up in the middle, wrap a pipe cleaner around it (you don't even need a whole one), and twist at the top for the "antennae."


Happy springtime!

Tuesday, May 4, 2010

Mother's Day project: watercolor flowers

Oh, Mother's Day. Why do you always sneak up on me so quickly?

I've been in the habit for the past two years (as long as I've been a mother) of having my daughter participate -- in whatever ways she's been able -- in creating a gift for the special moms in our family. There are four that we honor each year: her two grandmas, her great-grandma, and her biological mom. (Check out my mommy blog for more if that last one threw you for a loop! :)

I love having something for each of these special moms, and I especially love that my daughter has a part in whatever we do for them. It's nothing "amazing," but it's from her, and that makes it amazing.

This is the project we completed (times four) this year. Plan ahead with this one! We worked on it a little at a time over the course of about a week.


PHASE ONE -- You will need:
  • Watercolors
  • Paper

Let your little one paint, paint, paint to their heart's content!


This was my girl's first experience with watercolors, and she L-O-V-E-D it.


My wish-I-had-thought-of-that-sooner tip? Use a clean medicine dropper to add just a tiny amount of water to each paint tin. This eliminates the need for a cup of water (if you don't mind the color mixing, which at two, is inevitable anyway) -- and the equally inevitable spillage.


Allow the masterpieces to dry. :)


When dry, cut flower shapes out of the painted papers. I used a cookie cutter, because as I've said, I'm not an artist in any way, shape, or form. If you have even a SHRED more artistic ability than I, you could very likely manage without tracing. :)


PHASE TWO -- You will need:
  • Paint samples
  • Scrap cardboard (poster board, cardstock, construction paper... it would all work. You're just looking for something a bit thicker than regular paper.)
  • Glue

Cut up some paint samples.


And have your flowers cut out and ready.


I used a scrap of cardboard I had to draw these little flower pot shapes. Yes, I actually drew these myself! Be proud! :)


Lay out some of the paint sample squares/shapes for your child to choose from...


...and have them glue the squares onto the "flower pot" to create a "mosaic" of sorts. Allow to dry. You might want to put a heavy book on top of these as well, if you're bothered by the paint samples curling up.


PHASE THREE (I told you it was a long project!) -- You will need:
  • Colorful paper
  • Green pipe cleaners
  • Glue
  • Scissors
  • Your pre-assembled flowers and flower pots

Cut the pipe cleaners to whatever length you want the flower stems to be and glue onto the colorful paper.


Glue flowers on the stems. Silly me... I thought this was the bottom of the flower, but my daughter decided that it was the top. Heh.


Add as many flowers as you like...


...and then glue the flower pot to the bottom of the stems.


Here's her finished projects! A "quick craft" it's not, but they're cute and something totally different from what we've done before. I mean, really... how many handprint molds can one person have? :)

I tried to snap a few pictures of her holding each one of these for each of the recipients. And, I might have mentioned... she's two. I really wish Tylenol hadn't recalled all their products last week, because I was sorely needing some medication after that experience.

Tuesday, April 27, 2010

Rainy day scene

After a stretch of beautiful, warm, sunny weather, we've had several rainy days in a row. I guess that's bound to happen in the spring, and it makes us more grateful for those sunny days when they come!


You will need:
  • A piece of construction paper (light blue, light purple, gray... whatever color you want your sky to be)
  • Cotton balls
  • A lightning bolt or two (yellow construction paper)
  • A few rain drops (blue construction paper)
  • A couple aluminum foil puddles
  • Glue

Have your child pull apart the cotton balls.


Glue.


Add cotton to make clouds. I asked my daughter if she wanted to make one or two clouds, and she chose two.


She chose which cloud to attach the lightning bolt to.


She also chose where her rain drops would go... notice that the direction of some of them are a bit crooked. :)


Aluminum foil makes great puddles at the bottom of your weather scene.


Here's her finished product! This was a fun project that went right along with our day, and we also got to talk about how we don't have to be scared when it storms because Jesus protects us. :)

Tuesday, April 20, 2010

Spring butterflies

A couple days ago, my girl wanted to do a project. Specifically, she wanted to glue. I didn't have anything in particular planned for that afternoon, but she was persistent... so this is what we came up with in just a matter of minutes!


You will need:
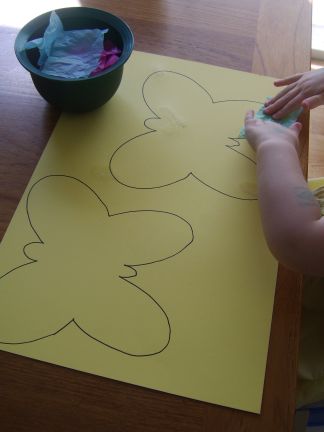
  • Paper or cardstock with butterflies traced on them (if you're even a slightly better artist that me -- and it's VERY likely you are! -- you can draw them freehand... I printed one online and traced it)
  • Tissue paper, any color (I had some still handy from our cherry blossom trees)
  • Glue
  • Scissors

I cut hot pink and teal tissue paper into manageable squares, but it doesn't have to be neat. If they're able, you could even suggest that your child tear their tissue paper rather than having it pre-cut.


Start gluing and attach the tissue paper however!


She first thought this would look nice laying flat...


...but then decided it would be much better if it were crumpled up a bit. :)


A lesson in symmetry? Try it with older kids!


Here was her page when she was finished. Yes, I know there's tissue paper glued completely outside the butterflies. I tried to explain... but not very hard. :) She wanted it THAT WAY, and you know what? Who cares?! :)

The bonus of this activity was that she did it almost entirely by herself, which fellow moms of toddlers can appreciate! I mopped the kitchen while she worked.

It was glorious.


When they were dry, I cut them out and taped them up in her play room. I had big plans to have her make a few more of these over the course of a week or so, and then hang them with ribbons from the light fixture in her play room... but then I decided she wouldn't really get to see them up close, so I changed my mind. My choice was confirmed when she came down from her nap on the day that I taped these up and gasped with delight when she saw them! I love how doing these simple little projects with her (and allowing her to do them by herself, to the best of her ability) builds so much confidence and pride in her work!